Exercise of basic usage of WebDNN
This article describes how to use WebDNN, the framework that enables Deep Neural Networks to run on web browsers, through an exercise.
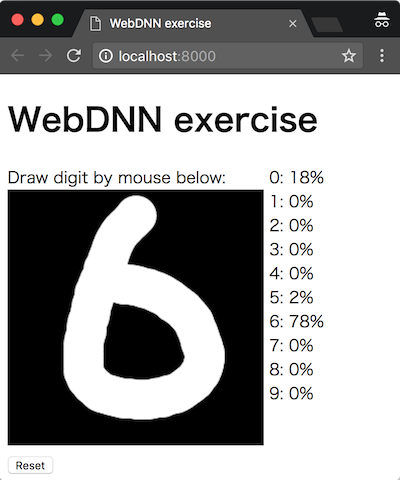
You will see the following display when you reached at the end of exercise. You can draw a digit in the black box, and the system recognizes what digit is drawn.
Working example is here.
The repository for WebDNN: https://github.com/mil-tokyo/webdnn
Assumed readers
In this exercise, deep learning itself is not described. It is assumed that you have basic knowledge of basic Python syntax and how to train simple image classification model using Keras or Chainer. It is preferred that you have JavaScript knowledge, but not mandatory.
The steps of the exercise
The steps of the exercise are follows:
- Environment setup
- Installation of WebDNN
- Training of DNN model
- Conversion of DNN model
- Implementation of HTML/JavaScript
- Operation check
In some codes, procedures of WebDNN are left blank. You have to edit it by some text editor.
This exercise supports most GUI environment on which Python 3.6 can be installed. For deep learning frameworks, Keras and Chainer are supported. NVIDIA GPU is not necessary.
Environment setup
If you have not downloaded webdnn-exercise repository, do it by the following command.
git clone https://github.com/milhidaka/webdnn-exercise
Set current directory to webdnn-exercise.
For Python environment, Python 3.6, numpy, Keras 2.0 or Chainer 2.0 are needed. Please note that Python 3.5 or earlier causes syntax error.
If you wish to setup a virtual environment with anaconda, use the following command.
conda env create -f environment.yml
In this case, a virtual environment is created with name webdnn.
source activate webdnn
will lead you to the virtual environment.
For JavaScript, only modern web browser is needed. We checked the behavior on Firefox, Chrome and Edge. For Safari users, please read “About Safari” section. “node.js” is not needed.
Installation of WebDNN
Let’s install WebDNN. In the package, Python program for model conversion and JavaScript library for running models on web browsers are contained.
git clone https://github.com/mil-tokyo/webdnn
cd webdnn
python setup.py install
cd ..
(commit 519bf7c as of editing)
Training of DNN model (Keras)
Click here for Chainer version of “Training of DNN model” and “Conversion of DNN model”
Please move to exercise directory. There are the answers and pre-computed output files in answer directory, so refer to them if you have some trouble.
cd exercise
These files are contained in exercise directory from the beginning.
train_mnist_keras.pytrain_mnist_chainer.pyconvert_model_chainer.pyindex.htmlscript.jspaint.js
train_mnist_keras.py is the code to train DNN model using Keras. train_mnist_chainer.py is the code to train DNN model using Chainer. convert_model_chainer.py is the code to convert Chainer model using WebDNN. index.html, script.js, paint.js are the codes which consist the web application that loads and works on the converted model. index.html, script.js have some sections you have to edit.
First, train the model which we would like to run on web browsers. In this exercise, we train a digit recognition convolutional neural network using MNIST dataset by Keras or Chainer. MNIST dataset is a dataset for classifying handwritten digits from 0 to 9.
Train the model by the following command. At this point, the code does not depend on WebDNN.
python train_mnist_keras.py
The model is trained and saved as keras_model.h5 file.
The input of the trained model is an image of 28px * 28px, 1 channel. Value range is 0 to 1 (not 0 to 255), and foreground is 1 and background is 0. The output is a vector of length 10. Each element corresponds to softmax probability representing each class (digit).
Conversion of DNN model (Keras)
Let’s convert the Keras model to a format which can be loaded to web browsers, using WebDNN. The format is called as “graph descriptor” in WebDNN.
The following command does the conversion.
python ../webdnn/bin/convert_keras.py --backend webgl --input_shape '(1,28,28,1)' keras_model.h5
There are several specification which enables fast numerical calculation on web browsers. In WebDNN, they are called as backend. WebDNN supports WebGPU, WebGL and WebAssembly backends. In this exercise we use WebGL since it is easier to setup. Specify option --backend webgl to use WebGL backend. If the environment is completely set up, you can specify multiple backends like --backend webgpu,webgl,webassembly. In this case, the web browser automatically selects a backend which is supported on it.
Additionally, you have to specify input array shape for the model. When you use an image as input, you will specify 4-dimensional information of batch size, height, width, channel. The order of these four information is called as data order, which corresponds to 1-dimensional arrangement of data in memory. The default of Keras is the order of batch size, height, width, channel 1. MNIST image is 28px * 28px, 1 channel (grayscale), so the option is --input_shape '(1,28,28,1)'. First 1 (batch size) can be replaced to other number in order to classify multiple images at once.
A directory named webdnn_graph_descriptor is created, and files such as graph_webgl_16384.json are created in it. These are the graph descriptor, and will be loaded from web browsers.
Implementation of HTML/JavaScript
Copy of WebDNN JavaScript
Copy the JavaScript library from WebDNN repository which was cloned previously. The library is for running the graph descriptor, which was generated previously, on the web browser.
cp ../webdnn/dist/webdnn.js webdnn.js
Implementation of HTML/JavaScript
Let’s implement the core of the web application. HTML is for visual structure, and JavaScript is for behavior logic.
Most part of the application is already implemented and you have to edit some parts which related to WebDNN. In case of doubt, copy and paste from files in the answer directory.
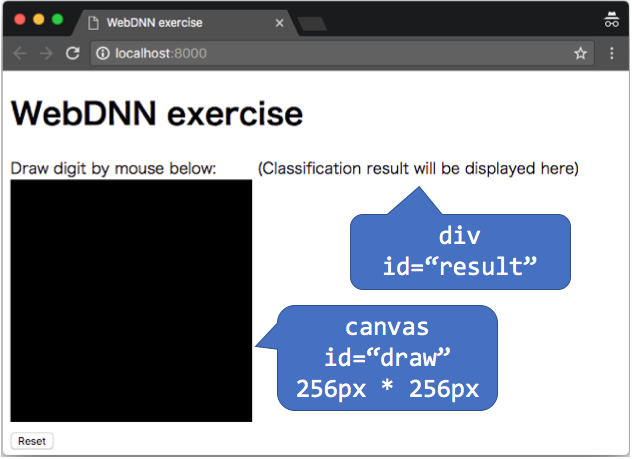
The page structure is as follows. The process needed is to provide the image drawn in "draw" to the model and display the classification result on "result". The part of drawing with mouse is already implemented in paint.js.
The files you need to edit are index.html and script.js. FIXME keywords are placed where you have to edit.
Edit of index.html
Load webdnn.js copied previously using script tag.
<meta charset="utf-8">
<!-- FIXME: load webdnn.js -->
<script src="paint.js"></script>
Edit of script.js
initialize function
// Load WebDNN model
webdnn_runner = /* FIXME */;
// Get view object for input / output variable of the model
// There can be multiple variables for input / output, but there is only one for this model
webdnn_input_view = /* FIXME */;
webdnn_output_view = /* FIXME */;
1: Loading of graph descriptor
WebDNN.load(directory)(Manual) loads the graph descriptor. This method generates a object named “runner”. Runner is the central object for controlling the execution of the model. directory argument is for the directory name where the graph descriptor is. Since WebDNN.load() is asynchronous function, so extract the result by await operator (reference). As a result, the code to be inserted to FIXME is await WebDNN.load('./webdnn_graph_descriptor');.
2: Obtaining input / output view
Obtain objects for manipulating input / output data. The objects are called as “view”. For this task, getInputViews() and getOutputViews() can be used (manual). There can be multiple input / output variables for a model in WebDNN, and one view is for one variable. In this model, only first one view for input / output, so store it to a variable by getInputViews()[0]. As a result, the codes to be inserted to FIXME are webdnn_runner.getInputViews()[0]; and webdnn_runner.getOutputViews()[0];.
calculate function
// set input data by scaling and flattening the image in canvas
// https://mil-tokyo.github.io/webdnn/docs/api_reference/descriptor-runner/modules/webdnn_image.html
var canvas_draw = document.getElementById('draw'); // canvas object that contains input image
webdnn_input_view.set(await WebDNN.Image.getImageArray(canvas_draw, {
  /* convert image on canvas into input array (Float32Array, 28px*28px*1ch=784 dimension, black=0.0 and white=1.0) */
  dstH: /* FIXME */, dstW: /* FIXME */,
  order: WebDNN.Image.Order.HWC, // for Keras
  // order: WebDNN.Image.Order.CHW, // for Chainer (but the same as HWC because channel=1 in MNIST)
  color: WebDNN.Image.Color.GREY,
  bias: /* FIXME */,
  scale: /* FIXME */
}));

// run the DNN
/* FIXME */;

// get model output as Float32Array
var probabilities = /* FIXME */;
1: Converting image on canvas and write to input variable
The data representing the image drawn by the user is stored in canvas object canvas_draw. To input it to the model, you need to convert it to a specific format. Although the method canvas_draw.getContext('2d').getImageData will give you the raw pixel values, but some conversion is needed to use it as the model input.
| Item | canvas data | the format the model accepts |
|---|---|---|
| Pixels | 256px * 256px | 28px * 28px |
| Color | RGBA(Color+transparancy) | Grayscale |
| Value range | 0~255 | 0~1 |
| Data order | HWC | HWC(For Keras model)、CHW(For Chainer model) |
Data order is the pixel order when the image is represented as 1-dimensional (flat) array. When the pixel brightness is represented by a function I(y, x, channel), HWC(height, width, channel) order means [I(0, 0, 0), I(0, 0, 1), I(0, 0, 2), I(0, 1, 0)...], CHW(chanel, height, width) order means [I(0, 0, 0), I(0, 1, 0), I(0, 2, 0), ..., I(0, W-1, 0), I(1, 0, 0), ...].
WebDNN.Image.getImageArray is the easy-to-use method to perform these conversion. Fill in the FIXME looking at manual.
2: Running the model
await webdnn_runner.run() runs the model. await is the operator to wait the asynchronous operation to complete.
3: Getting the computation result from the output view
webdnn_output_view.toActual() gives the computation result of the model (probability for each class). The procedure later is for processsing it for displaying.
Operation check
Run HTTP server for testing
To enable the web browser to open the created webpage, run an HTTP server.
python -m http.server
The server is now waiting for access, so proceed to next section. Ctrl-C will terminate the HTTP server.
Access with web browser
Access the created webpage using a web browser.
Click and drag the mouse on the black box to draw a digit (0 to 9). If there is no problem, correct classification result will be displayed next to the box.
Smaller digit in the center of the box seems to be easier to be recognized.
If there are any trouble, debug by investigating error messages on the developer console.
The following error is no problem. This error is caused by the lack of graph descriptor corresponding to WebAssembly backend.
GET http://localhost:8000/webdnn_graph_descriptor/graph_webassembly.json 404 (File not found)
About Safari
WebDNN supports Safari, the built-in browser of Mac OS. However, it will not work like other browsers in the procedure of this exercise. In this exercise, WebGL is used as the backend for WebDNN, but it is not compatible with Safari. In Safari, WebGPU and WebAssembly backend are supported. WebGPU backend requires browser setting (https://mil-tokyo.github.io/webdnn/docs/tips/enable_webgpu_macos.html). WebAssembly backend does not require the browser setting, but setting up the development environment requires some time.
To try the exercise using Safari, overwrite the contents of webdnn_graph_descriptor directory (generated by convert_keras.py) by the contents of webdnn_graph_descriptor_for_all_backend in the root of repository. It contains graph descriptors corresponding all backends, so it is possible to run WebDNN on Safari using WebGPU (if enabled) or WebAssembly backend.
-
keras.backend.image_data_format() == "channels_last"means batch size, height, width, channel."channels_first"means batch size, channel, height, width. WebDNN does not support the latter. ↩